In order to add a new sales order (SO), it is necessary to:
- Select the button [New Order] in the main menu (hidden by default), or
- Select [Add] → [Order] on the list of sales orders and quotes
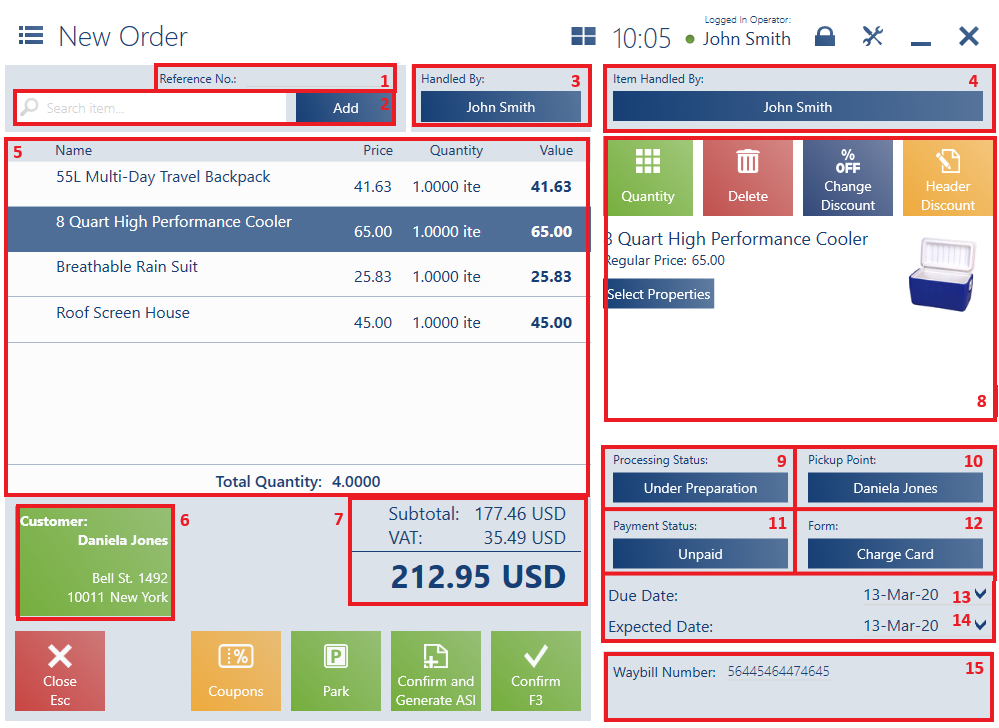
The form of a sales order document contains the following fields (particular points correspond to areas marked in the figure above):
1. Reference No. (editable)
2. Search item – it makes it possible to search and add an item to the document
3. Handled By – it displays the name of a person responsible for the document
5. Document Item List, containing the following columns:
- Name
- Price
- Quantity
- Value
Hidden by default:
- Base Price
- Regular Price
- No.
- Code
- VAT
6. Customer – it enables the user to select a (primary and secondary) customer for the document
7. Summary – it presents the total value of all document items:
- Total – displayed for documents with the VAT direction specified as On Total
- Subtotal – displayed for documents with the VAT direction specified as On Subtotal
- Discount
- Mark-Up
- Prepayments
- VAT – displayed for documents with the VAT direction specified as On Subtotal
- The overall sales value after considering a discount/mark-up/VAT
8. Document Item Details – it presents detailed information on a document item and enables the user to change the item’s quantity, regular price, etc.
9. Processing Status – it displays values defined in the ERP system. In order to change a processing status, the user needs to have relevant permissions. A status may be changed in unconfirmed, confirmed, and pending orders.
10. Pickup Point – it makes it possible to select the order’s pickup point from among the available options:
- Store to Door Delivery – it contains the addresses of a customer selected in the document, with a possibility to add a new address with the use of the button [Add Address]. If there is a secondary customer different than the primary one selected in the document, displayed addresses are retrieved from the secondary customer’s form. After the confirmation of entered address details, the application returns to the order form, and the [Pickup Point] button displays the name of a customer whose pickup address has been selected. If the customer is changed or if the secondary customer is deleted, the [Pickup Point] button is cleared.
- In-Warehouse Pickup – it contains the addresses of warehouses defined as pickup points available to the POS workstation. The application first presents addresses assigned to a center to which the POS workstation belongs.
- In–Store Pickup – it contains the addresses of centers defined as pickup points available to the POS workstation. The application first presents addresses assigned to a center to which the POS workstation belongs.
- Customer addresses defined as pickup points – selecting such a tile displays addresses defined as pickup points available to the POS workstation and associated with a customer whose name is displayed on the tile
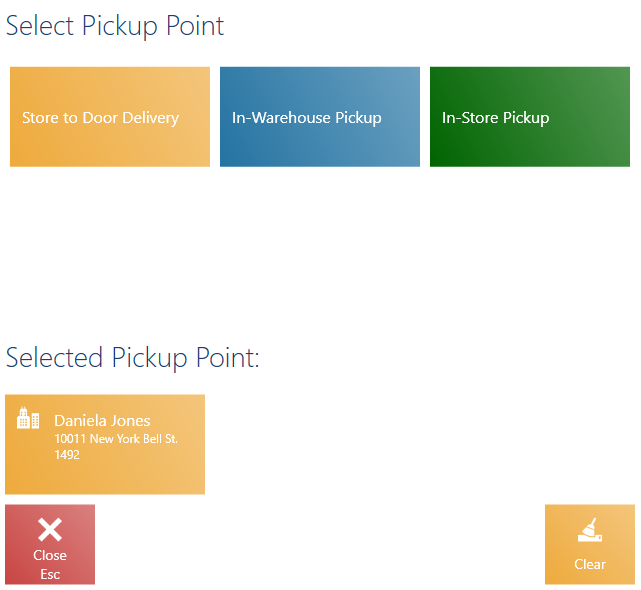
The Select Pickup Point window contains a filter enabling the user to search by a pickup point’s name and address (city, street, zip code). The field Selected Pickup Point displays a currently selected pickup point. The [Clear] button allows the user to remove a selected pickup point. A pickup point may be changed until the order is confirmed.
11. Payment Status – it displays values defined in the ERP system. In order to change a payment status, the user needs to have relevant permissions. A status may be changed in unconfirmed, confirmed, and pending orders.
12. Form – it is set as the default payment form of a customer selected in the document, with a possibility to change it. If the customer’s default payment form is not available on the POS workstation, the application sets a payment form of the Cash type assigned to the workstation. The field is editable.
13. Due Date – it displays the default due date of a customer selected in the document. The field is editable.
14. Expected Date – it displays the order’s expected date
15. Attributes – it displays attributes assigned to the document type
The form of a new sales order contains the following buttons:
- [Park] – it saves the document as unconfirmed to enable its completion later or on another workstation
- [Confirm] – it confirms the document
- [Print] – it prints the document (hidden by default)
- [Coupons] – it displays discount coupons
- [Calculate Promotions]/[Promotions] – it calculates/deletes bundle promotions
- [Confirm and Generate ASI] – it generates an advance invoice after confirming the order